Pear Blossom Press – T-Ruler Card Measurements
It sounds tricky, but if you have the Pear Blossom t-rulers, they measurements for the layer boarders are on the top of the ruler. The set-in parts, called jigs, have the layer sizes on them:
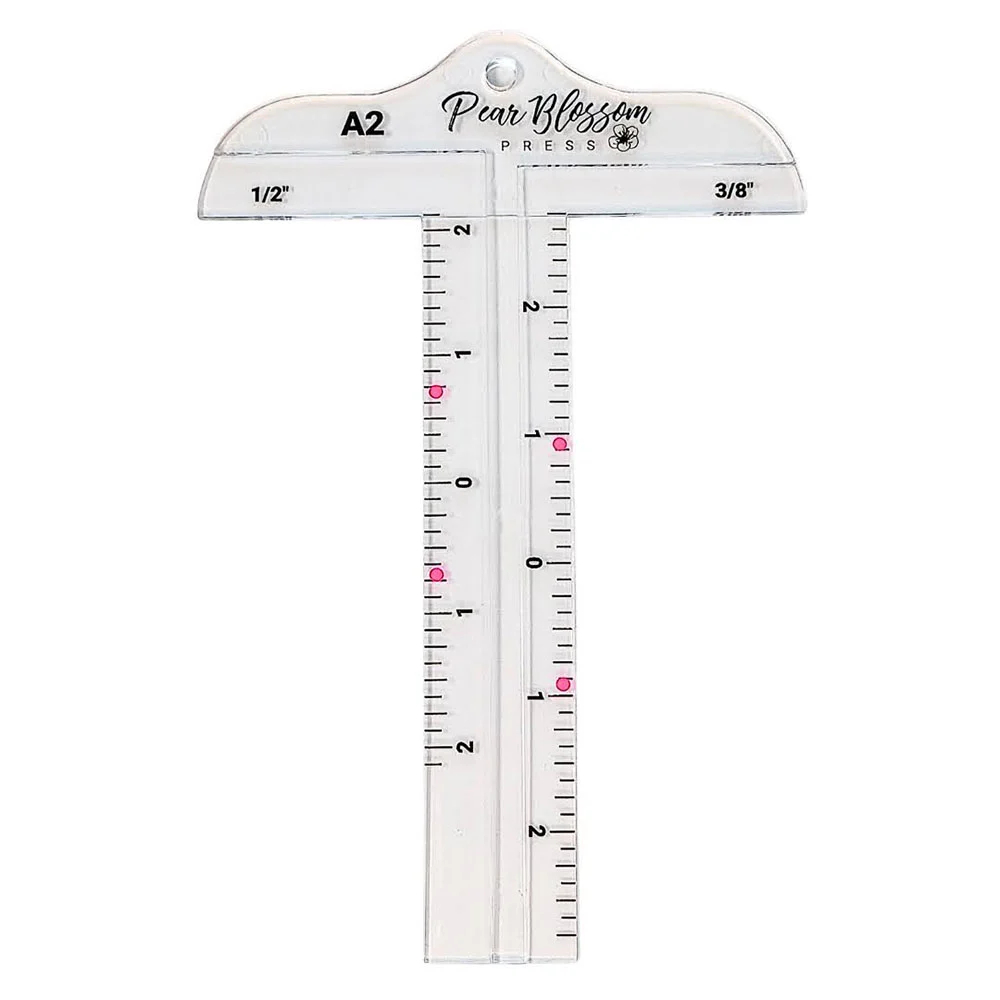
For instance, in the image above, the border sizes are 1/2 inch and 3/8 inch. Just double those measurements to get the size of the card you need to cut. So for instance, your card base is 5 1/2″ x 4 1/4″ and you want to use the 3/8” jig. You would need to double that measurement to get 3/4″. Now, cut your mat layer at 3/4″ smaller than your card base at: 4 3/4″ x 3 1/2″.
Then, if you wanted to use the 1/2″ jig for the next layer, cut your next layer to be 1 inch smaller than that first layer at 3 3/4″ x 2 1/2″.
If you are using the A7 ruler, cut your layers as follows:
Card base – 5 1/2″ x 4 1/4″
First layer using the 1/8″ jig – cut the card at 1/4″ smaller to be 5 1/4″ x 4″
Second layer using the 1/4″ jig – cut the card at 1/2″ smaller to be 4 3/4″ x 3 1/2″
You can mix and match any of the jigs by just doubling the jig measurements and cutting the card down by that much for whichever size mat you want to layer. Below is the explanation by ChatGPT which is easier than mine!
A2 (Width × Height): 4 1/4″ × 5 1/2″
Smallest border: 3/8″ jig (subtract 3/4″)
Layer 1: 3 1/2″ × 4 3/4″
Next border: 1/2″ jig (subtract 1″ from the previous layer)
Layer 2: 2 1/2″ × 3 3/4″
Full “recipe” (smallest first)
4 1/4″ × 5 1/2″ → 3 1/2″ × 4 3/4″ → 2 1/2″ × 3 3/4″
A7 (Width × Height): 5″ × 7″
Smallest border: 1/8″ jig (subtract 1/4″)
Layer 1: 4 3/4″ × 6 3/4″
Next border: 1/4″ jig (subtract 1/2″ from the previous layer)
Layer 2: 4 1/4″ × 6 1/4″
Full “recipe” (smallest first)
5″ × 7″ → 4 3/4″ × 6 3/4″ → 4 1/4″ × 6 1/4″